Tutorial for FileZilla
Connecting to a server
The first thing to do is connecting to a server.
The following credentials are required to connect to the server, You will find thiese information onj your Hosting Welcome Email (New Account Information):
Hostname: yourdomain.com
Username: your cpanel username
Password: ************
At the top of your Filezilla window, you will see a Quickconnect bar.
Enter the hostname into the quickconnect bar's Host: field, the username into the Username: field as well as the password into the Password: field.
You may leave the Port: field empty unless your login information specifies a certain port to use. Now click on Quickconnect.
Navigating and window layout
The next step is to get familiar with FileZilla's window layout.
Here is a quick introduction: Below the toolbar (1) and quick connect bar (2), the message log (3) displays transfer and connection related messages. Below, you can find the file listings. The left column (local pane, 4) displays the local files and directories, i.e. the stuff on the PC you're using FileZilla on. The right column (server pane, 5) displays the files and directories on the server you are connected to. Both columns have a directory tree at the top and a detailed listing of the currently selected directory's contents at the bottom. You can easily navigate either of the trees and lists by clicking around like in any other file manager. At the bottom of the window, the transfer queue (6) lists the to-be-transferred and already transferred files.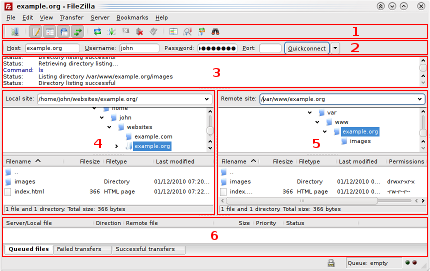
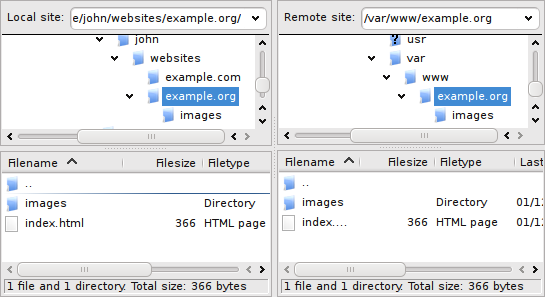
Uploading
First - in the local pane - bring the directory into view which contains data to be uploaded (e.g. index.html and images/). Now, navigate to the desired target directory on the server (using the server pane's file listings). To upload the data, select the respective files/directories and drag them from the local to the remote pane. You will notice that the files will be added to the transfer queue at the bottom of the window and soon thereafter get removed again - since they were (hopefully, if nothing went wrong) just uploaded to the server. The uploaded files and directories should now be displayed in the server content listing at the right side of the window.